It All Started A Couple Of Years Ago
In 2014, a DRM module from BuyDRM was introduced as part of the Wowza Streaming Engine (WSE). The idea was to enable PlayReady DRM encryption within the platform that was stable and easy to setup and use. Through the implementation of a mappings file users could encrypt one stream and leave others unencrypted if necessary.
This module is still available to BuyDRM KeyOS MultiKey Service clients as part of deploying Wowza with KeyOS.
More DRM For My Output
Today the market has modernized to the point where all three consumer DRMs are in play, – Microsoft PlayReady, Google Widevine and Apple's Fairplay. As a result of this DRM proliferation, BuyDRM has created a KeyOS MultiPack Wowza Module which you can use in your WSE setup and protect your MPEG-DASH, MSS and HLS assets with these various DRM technologies.
- 01:01 - Getting WSE ready
- 02:35 - Setting up user rights in your WSE
- 02:59 - Adding KeyOS MultiPack Wowza Module to your application
- 05:37 - Setting up KeyOS MultiPack Wowza Module
- 10:50 - Creating mappings file
- 15:07 - Preparing to test the setup & checking the manifest for DRM
- 18:38 - Testing the playback
Setup in Under 5 Minutes
As with all our products we try to make the setup as fast and as user friendly as possible. We think we hit our goals with the KeyOS MultiPack Wowza Module as well. It can be setup in no time in a few easy steps. Let’s try it.
For the examples coming up, we will be using a Windows machine in this example, but it is the same for Wowza on Linux.
Ready? Let’s Go!
1. Downloading your tools
You begin with downloading your WSE from your Wowza account. When this is done, and it is installed, you can go ahead to your KeyOS account ( at https://www.keyos.com ) and download the KeyOS MultiPack Wowza Module from your “Products” page. You will get a .jar file which you must place in to your WSE’s [install-dir]/lib/ folder.
2. Setting up WSE
Open your WSE console which is usually accessible using this address:
http://localhost:8088/enginemanager/login.htm.
After your login you should see the home page or a dashboard. It contains different stats in which we are not interested in right now.
- Click on the “Server” menu in the top menu and click on the “Users” tab in the left menu to see the list of users who can work with your WSE setup.
- Select the user who will be setting up your applications and click on this name.
- Make sure that “Allow access to advanced properties and features” is checked as shown in the Figure 1. Below.
Figure 1. “Adding permissions to users”
3. Creating the application
Next you can go ahead and create your application which you will use to protect your assets. Click on the “Applications” in the top menu and select the type of the application you want: Live or VoD.
Next, select the name and choose what formats you wish to process and click “Save” when you are satisfied with your selection.
Figure 2. “Create the application”
4. Adding KeyOS MultiPack Wowza Module to the application
To add the DRM module to the application to allow it to protect your output assets, all you need to do is click on the “Modules” tab in your application and enter the module information as shown on Figure 3.
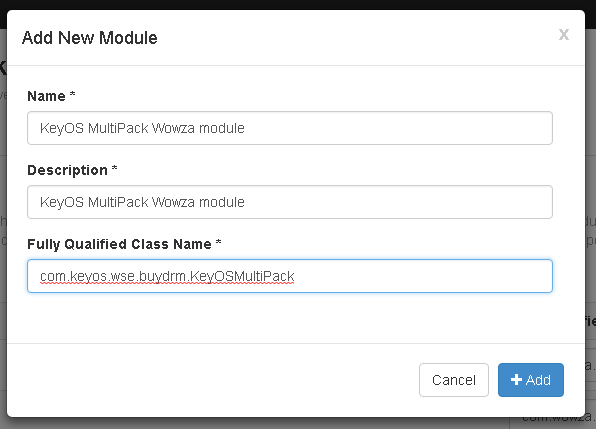
Figure 3. “Adding DRM module to the application”
The values are the following:
- Name: KeyOS MultiPack Wowza Module
- Description: KeyOS MultiPack Wowza Module
- Fully Qualified Class Name: keyos.wse.buydrm.KeyOSMultiPack
The name and the description can be anything you like, but, the class name must be exactly as mentioned above: “com.keyos.wse.buydrm.KeyOSMultiPack”
Click “Add” to finish module addition and let’s setup the module next.
5. Setting up the KeyOS MultiPack Wowza Module
The next step to adding DRM support in WSE is the Module setup. You can do that either by altering custom properties of your application through the console, or by altering the Application.xml which is in the[install-dir]/conf/[application]/ folder.
To alter setting through the console, simply go into your application’s Properties tab and click on “Custom” in the quick links field. It will get you to the Custom properties and will allow you to alter them by clicking on the “Edit” button.
Here are the KeyOS MultiPack Wowza Module’s related properties:
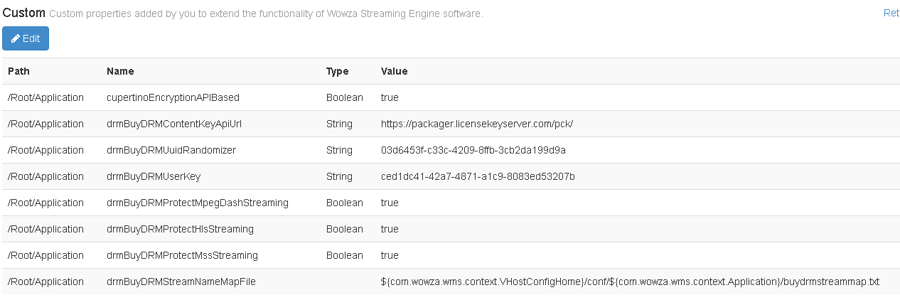
Figure 4. “KeyOS MultiPack Wowza Module properties”
Note: all properties are case sensitive, please, pay attention to properties names.
- drmBuyDRMContentKeyApiUrl - The API of the KeyOS Encryption Key API where WSE takes the keys used for content protection. For test purposes it can be set to use HTTP. For production, HTTPS must be used for communication with this service.
- drmBuyDRMUuidRandomizer - The unique UUID value that makes encryption keys random across your WSE setups. Make sure you generate it randomly for your application. You can use https://www.guidgenerator.com/online-guid-generator.aspx or any other generator.
- drmBuyDRMUserKey - The User/Packaging key which you can get from your KeyOS Console's Account Management menu.
- drmBuyDRMProtectMpegDashStreaming - Defines whether MPEG-DASH output must be protected.
- drmBuyDRMProtectHlsStreaming - Defines whether HLS output must be protected. If this flag is set to true then cupertinoEncryptionAPIBased must also be set to true.
- cupertinoEncryptionAPIBased – An additional WSE API which the KeyOS MultiPack Wowza Module utilizes to apply protection to HLS output.
- drmBuyDRMProtectMssStreaming - Defines whether MSS output is protected.
- drmBuyDRMStreamNameMapFile - Defines path to the mappings file.
6. Creating the mappings file
The mappings file is what tells the KeyOS MultiPack Wowza Module how to package your content and what content to package. For the sake of simplicity, please, make sure you have created the buydrmstreammap.txt in a folder you specified in drmBuyDRMStreamNameMapFile, and you set its content to:
*={keyId:${KeyIdGenerator.Value},keyIdDeriveFrom:${Stream.Name},contentId:${KeyId},mediaId:${Stream.Name}}
What the above command does is it tells the KeyOS MultiPack Wowza Module to try and package every output that comes out of your application.
7. Testing
After passing through these steps you are basically done with the setup.. Make sure you have restarted your application and you can test it by playing back some test content. Start by putting it in your “Contents” folder which may be anywhere on your server based on how you setup your application. Let’s presume it is located here [install-dir]/content/[application]/ and its name is sample.mp4. In this case your DRM protected assets may be available using the following links:
- https://your-wse-server.com/application_name/mp4:sample.mp4/manifest.mpd – for an MPEG-DASH output with Widevine from your source MP4 file
- https://your-wse-server.com/application_name/mp4:sample.mp4/Manifest – for a Microsoft Smooth Streaming output with CENC for Widevine and PlayReady from your source MP4 file
- https://your-wse-server.com/application_name/mp4:sample.mp4/playlist.m3u8 – for an HLS output with FairPlay from your source MP4 file
- Put those into your favorite HTML5 player or any other client that supports the DRM used
- Point it to the KeyOS MultiKey License service
- Generate a demo authentication XML in one click which you can now do through: Tools -> Auth. XML Generator in your KeyOS Console ( https://www.keyos.com )
- If you’ve done everything right you should see how your DRM protected content plays back.
I want more!
If you want or need more information about mapping files and ways to generate KeyIDs to use them in your authentication XML to link the asset to in the license request, you can find this info in the KeyOS Wiki in your KeyOS account. If you have questions just submit a support ticket via the “Support” Tab and we will respond promptly. We hope this guide has been helpful in your DRM deployment.


