


Good News!
Recently, BuyDRM and AWS Elemental have integrated their solutions to enable content operators to deploy more streamlined video workflows for live TV and VOD content. Using this integration, AWS Elemental’s Media Services solution acquires content encryption keys from the KeyOS platform and uses them to encrypt content. Upon playback, users acquire the license key directly from the KeyOS MultiKey service platform to their playback device.
For the sake of security, you must login to your KeyOS Account at www.keyos.com and search the Wiki for the actual SPEKE URL you must use along with more detailed information about deploying KeyOS with AWS Elemental’s cloud media services.
Why And What Did We Do?
Media customers rely on cloud-based media workflows to easily encrypt live and file-based video content for delivery to consumers.
AWS Media Services are cloud-based services with pay-as-you-go pricing which provide customers the capability to ingest, process, package, and deliver video content at scale. AWS Elemental MediaLive is a real-time video encoding service and works in combination with AWS Elemental MediaPackage for content origination, just-in-time packaging, and encryption. AWS Elemental MediaConvert is a file-based video transcoding service with packaging and encryption capabilities and may be used independently or with a third-party origin.
The KeyOS Platform is a Digital Rights Management (DRM) platform from BuyDRM that provides complete multi-DRM license key delivery for a variety of packaging formats to secure playback across a broad range of client devices. The KeyOS API integration with AWS Elemental MediaConvert and AWS Elemental MediaPackage provides customers with secure, scalable, standards-based solutions for protecting live and on-demand video workflows. MPEG-DASH content with Google Widevine and Microsoft PlayReady, HLS content with Apple FairPlay Streaming or Microsoft PlayReady, and Microsoft Smooth Streaming with Microsoft PlayReady are all supported.
You can read more about challenges and this integration tries to resolve and features available here
What's In The Video?
In this vlog we discuss different steps of setting up AWS MediaPackage and MediaConvert with BuyDRM infrastructure.
We go over roles and permissions you need to create to be able to use AWS services. We then go over setting up the API within the AWS API Gateway. The API will act as a proxy between your AWS services and BuyDRM services. Last, but not least, we are looking into how to setup AWS MediaConvert for creating DRM protected MPEG-DASH and HLS VoD assets as well as look into how to setup AWS MediaPackage to protect your Live streams.
- 01:20 - Setting up Roles and Permissions
- 11:01 - Creating The API Within the API Gateway
- 18:25 - Creating More Restrictive Permissions for Services
- 21:25 - Setting up MediaConvert Service for MPEG-DASH + Widevine/PlayReady
- 27:30 - Setting up MediaConvert Service for HLS + FairPlay
- 31:47 - Setting up MediaPackage
- 36:30 - Summary
Going Through Setup
Setting up IAM Permissions
Creating a Role for MediaConvert
You can start by creating a Role for the MediaConvert Service. go into Service -> IAM and then select Roles. This is the page where you will create a role that allows your services to interact with API Gateways and work with your S3 storage. When you create a role you are presented with a way to define what services will either be using the role or will be assigned to it.
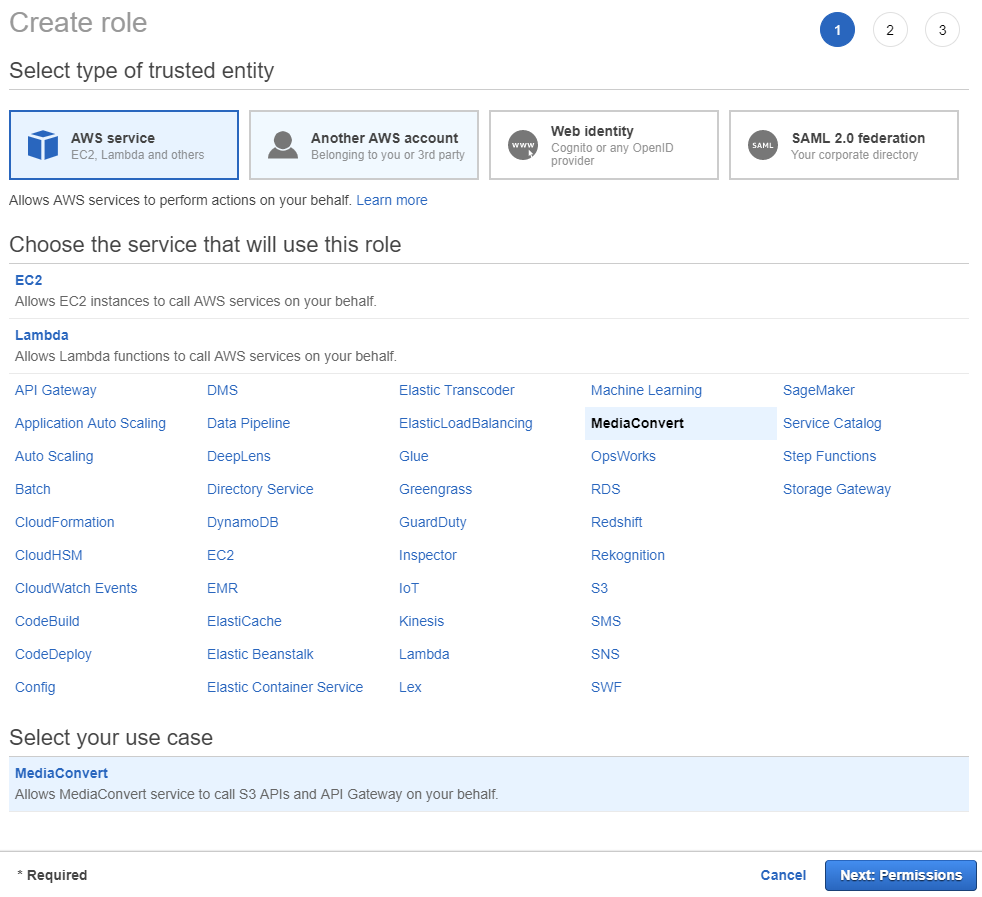
Figure 1. Creating a role for MediaConvert services.
Select MediaConvert and click on Next: Permissions button to get to the next screen and see the attached permissions.
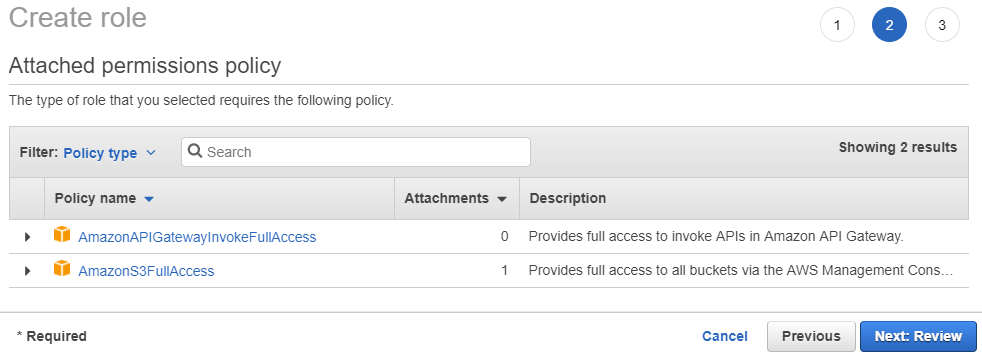
Figure 2. Permissions attached to MediaConvert-type role.
To review the role, click Next: Review, give the role a name, for example, KeyOS-MediaConvert, and finish creating the role by clicking Create role button on the last screen. When the role is created it will appear in the list of all roles for your AWS account.

Figure 3. Role trusted entities.
Important: Remember that your roles must be trusted by a service to which it will be assigned. If your role is not within the trusted entities, you will have permission errors. Here, as you can see from the Figure 9, the role is created and trusted by a mediaconvert entity, which is fine because we will use it in a MediaConver service.
Creating a Role for MediaPackage
Creating a role for the MediaPackage service is a bit tricky. As of this document creation, there is no way to select MediaPackage service when you create a role for a service. To create one for MediaPackage and make it trustable, here is what needs to be done.
First, create a policy allowing the API Gateway to be used by the service. While still in the IAM service, go into Policies from the left menu and click the Create policy button. When on a create policy page, go into JSON mode and enter the following:
{
 "Version": "2012-10-17",
 "Statement": [
 {
 "Effect": "Allow",
 "Action": [
 "execute-api:Invoke"
 ],
 "Resource": "arn:aws:execute-api:*:*:*"
 }
 ]
}
Click on the Review policy button and enter the name of the policy, for example KeyOS-MediaPackage-Policy. To finish the setup, click the Create policy button.
Now. you need to attach the policy to the Role. To create a role click on Roles in the left menu and click the Create role button. From the list of available services, choose the S3. (Do not worry that S3 is not the service for which we created this role.) Click on the Next: Permissions button to go onto the role's permissions page. From the filter field above, select Customer managed so you can see the customer managed permissions
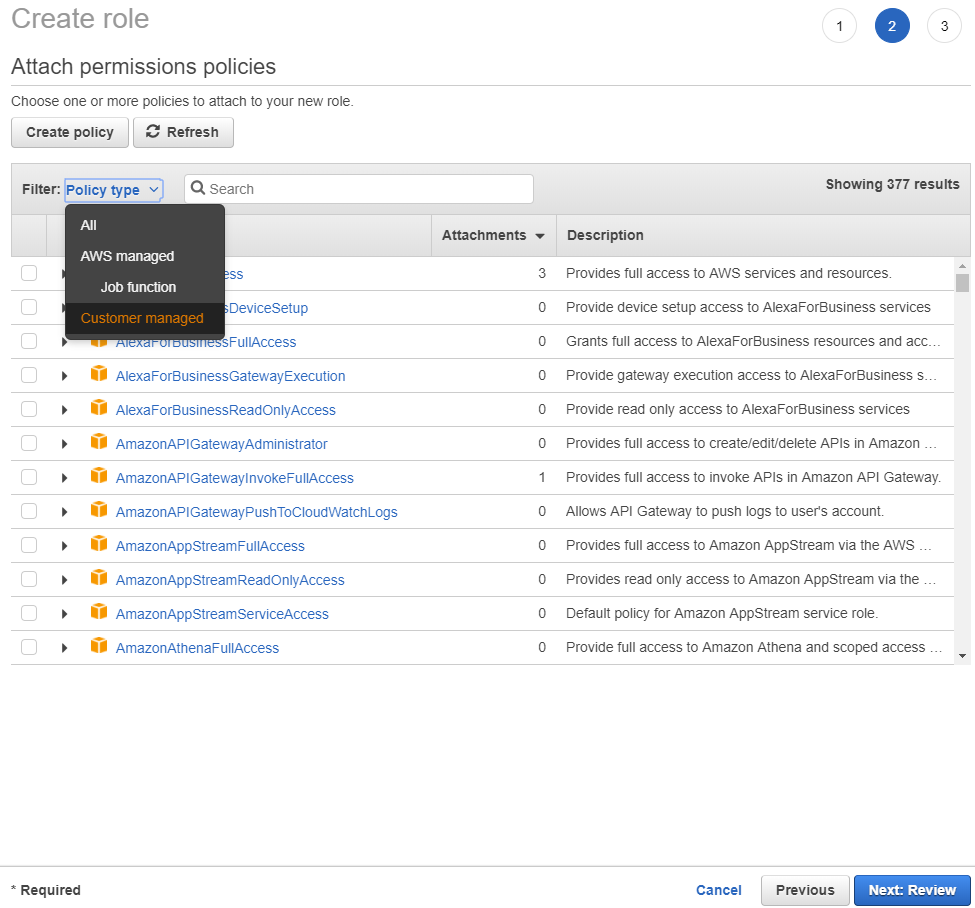
Figure 4. Filtering to see Customer Managed permissions.
Start typing the name of the permission we created in the previous step and you should see it appear in the list. Put a check next to it to attach it to the role and proceed to the Review screen by clicking Next: Review button.
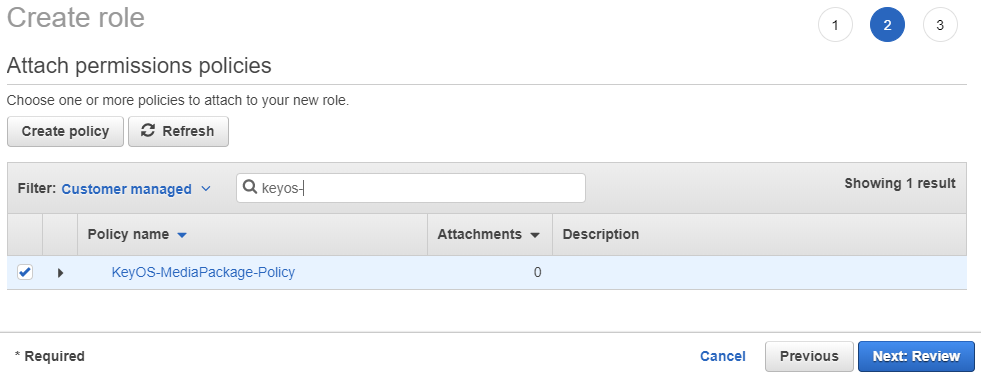
Figure 5. Attaching created permission to a role.
Enter the name of the role, for example KeyOS-MediaPackage, put a role description to remind you what this role does and click on Create role button.
Once you are back on the list of all roles, you can check the trusted entities column for newly created roles and you will notice that it defaults to S3, which is not what you want. To change that, click on your role and you will be redirected to the edit page. Select the Trust relationships tab and click Edit trust relationship.
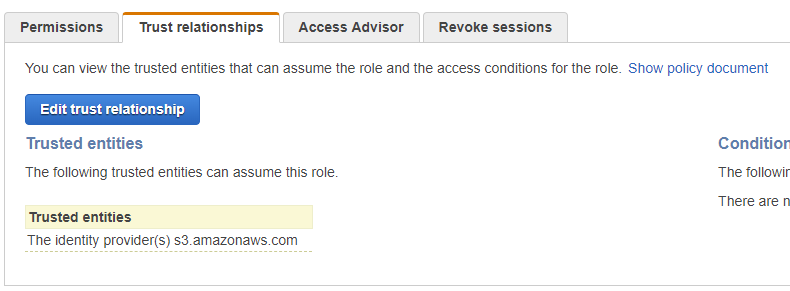
Figure 6. Getting ready to edit role's trusted entities list.
The policy should look like this:
{
 "Version": "2012-10-17",
 "Statement": [
 {
 "Effect": "Allow",
 "Principal": {
 "Service": "mediapackage.amazonaws.com"
 },
 "Action": "sts:AssumeRole"
 }
 ]
}
You see that S3 is changed to the mediapackage. Click on the Update Trust Policy button to save the document. Now, when you click on Roles in the left menu and filter to see only ones you’ve created so far, you will notice that both roles now have valid trusted entities assigned to them.

Figure 7. Correct trusted entities.
You see that S3 is changed to the mediapackage. Click on the Update Trust Policy button to save the document. Now, when you click on Roles in the left menu and filter to see only ones you’ve created so far, you will notice that both roles now have valid trusted entities assigned to them.
Creating permissions for API to push logs to CloudWatch
Last, but not least, you need to create a Role for your API to allow it to push logs into CloudWatch. To do this, simply create a Role for the API Gateway. The Role will contain the single policy called AmazonAPIGatewayPushToCloudWatchLogs. This is enough for the Role to be allowed to push data to your CloudWatch.
Setting up an API Gateway
Creating a new API
Before you can use MediaConvert or MediaPackage AWS services, you need to create a point of access that these services will use to reach out to the KeyOS MultiKey Services. This is done by creating an API Gateway in your AWS account. To start the setup, go to Services -> API Gateway in your AWS console and click on the Create API button. You should see a screen like the one below.
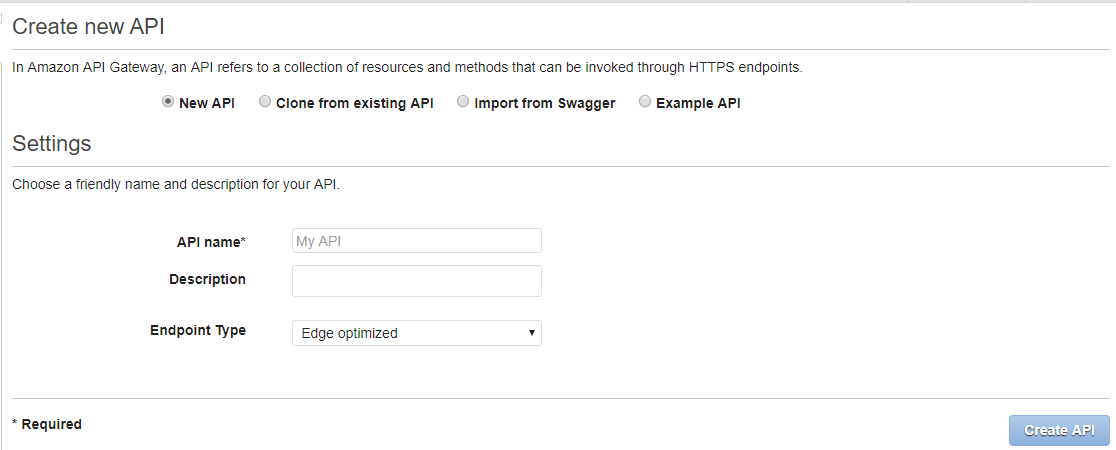
Figure 8. Create new API Gateway screen.
Enter the API name and click the Create API button. For this tutorial we will be using Wiki Sample API as the name of our new API Gateway.
Creating Resources
The next step is to create methods and resources for your API. You can think of resources as endpoints that your services will be calling, and methods are your simple POSTs and GETs. Start by clicking the Actions dropdown button and selecting Create Resource. You should see a screen similar to one below.
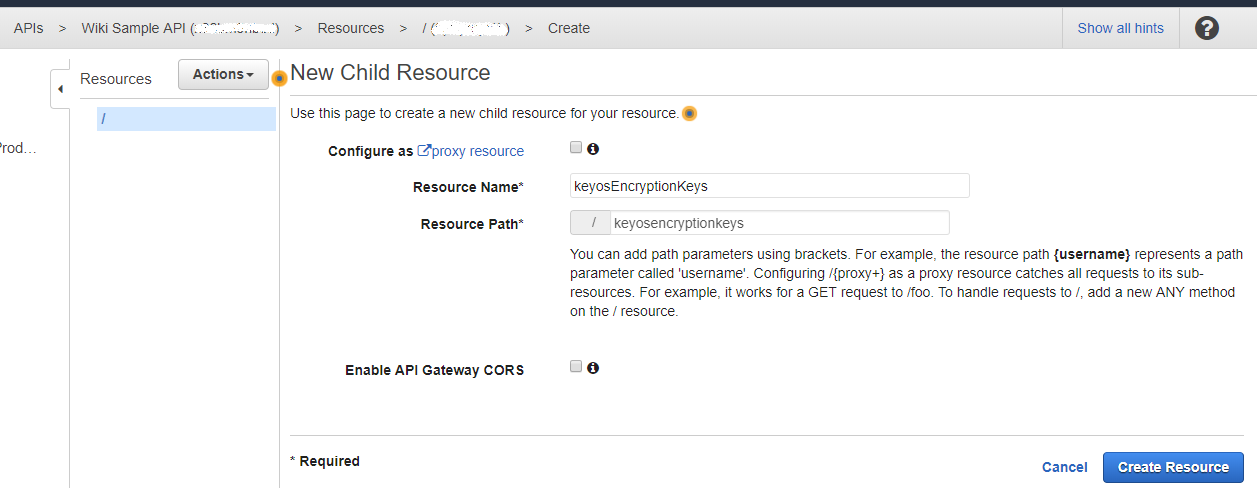
Figure 9. Create a new API resource/endpoint.
In official AWS documentation for MediaConvert and MediaPacakge, you may find that the Resource Name is copyProtection; however, you may choose your own Resource Name. In this tutorial, we use keyosEncryptionKeys.
After you have named your resource, go ahead and click the Create Resource button.
Creating Methods
We now need to add method to the resource. Click Actions -> Create Method, select POST from the dropdown menu and click the check mark. You will be shown a screen similar to the one below.
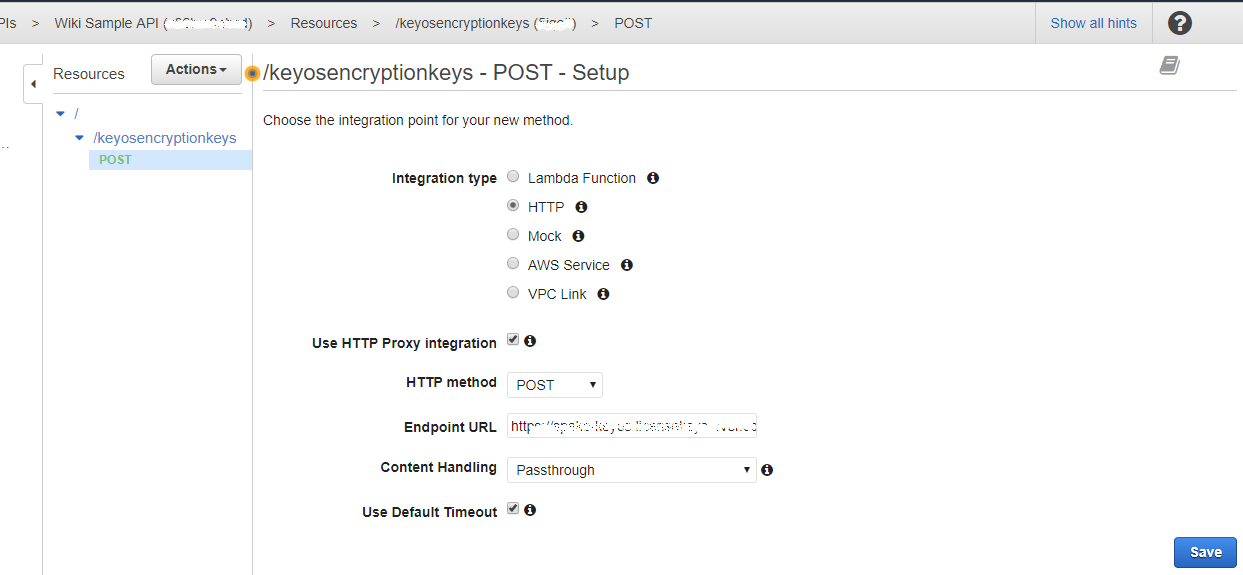
Figure 10. Create new API method.
Make sure that you have selected HTTP for the Integration type and that the Use HTTP Proxy integration is checked. Also, make sure that you set the Content Handling dropdown to Passthrough and set the Endpoint URL to BuyDRM SPEKE Endpoint. Hit Save to save your method settings.
Setting up custom POST headers
To finish setting up the API Gateaway you must set your UserKey/PackagingKey. You can get this value from your Account Settings page in the KeyOS Console. The value must go into the custom POST header called keyos-userkey. To add the header, click on the Integration Request block and enter your user key into the HTTP Headers section. See Figure 4 and Figure 5 for reference.
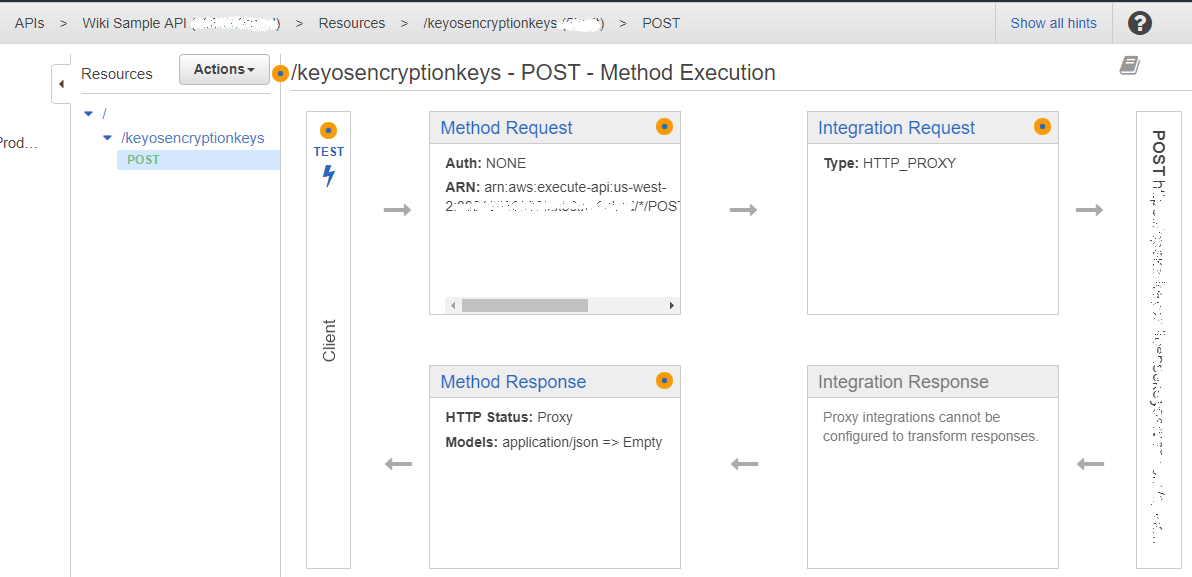
Figure 11. POST method setup.

Figure 12. Adding custom POST headers to requests processed by API Gateway.
Note: your user key value must be in single quotes or else requests will fail.
Deploying the API
Once you have created your API, and created the resource and the method, your final step is to deploy the API Gateway and make it live for your other AWS services to use. To do that, click Actions -> Deploy API. When presented with the choice of the deployment stage, select [New Stage] and give it a name, for example production_v1_0. When the API is deployed, you can optionally enable logs. In this case above, all requests that go through this API will be logged into the AWS CloudWatch service. This logging feature can be useful for debugging
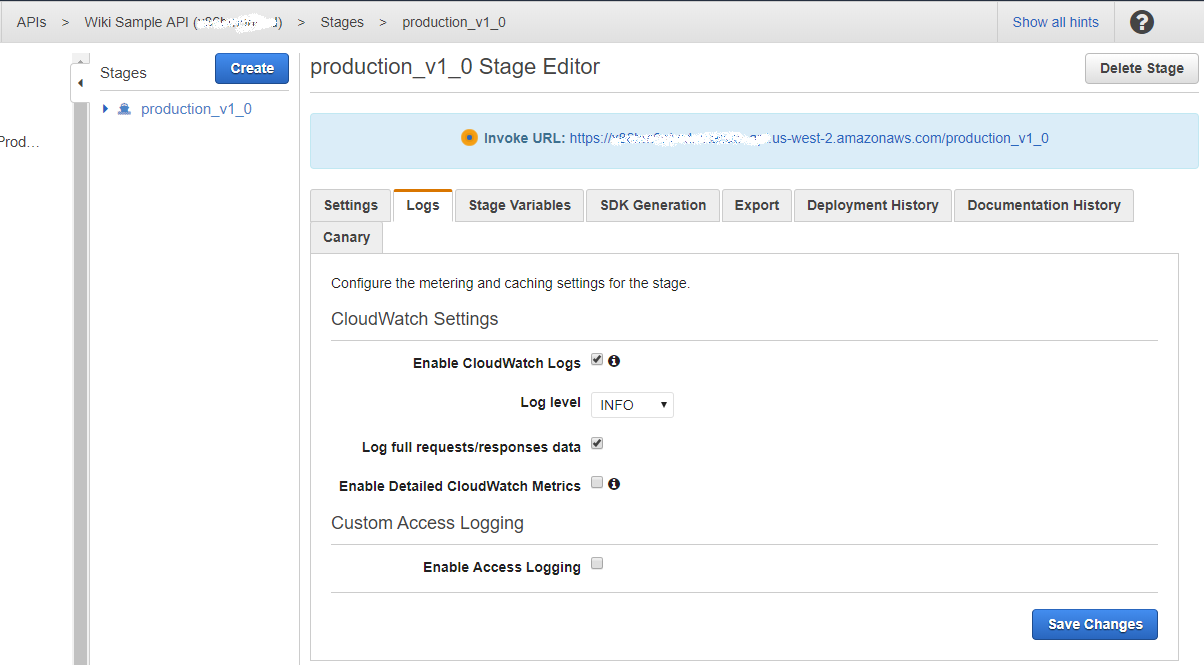
Figure 13. Deployed API.
Note: on this screen you are presented with the URL of your API, which you will later use in other AWS services.
Setting up MediaConvert Service
The AWS Elemental MediaConvert allows you to convert file-based content for broadcast and multi-screen delivery. It has many encoding related features, but we are going to focus on how to apply DRM to the output of the MediaConvert service. To start working with it, go to Services -> MediaConvert. You will see a page describing what MediaConvert is and a button that invites you to get started with Job creation. Click on that button to open the UI for job creation.
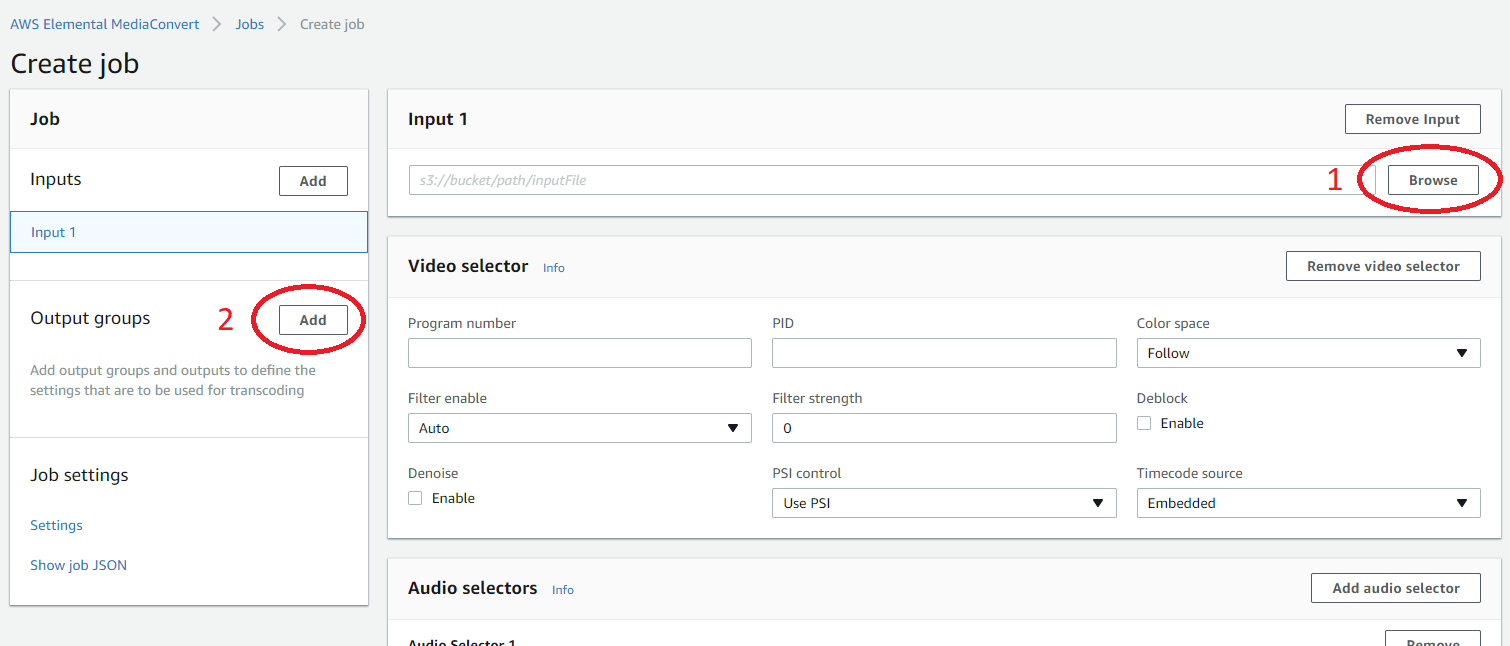
Figure 14. Job creation screen.
Creating output with DRM protection
To create a convert job that will convert your existing file into some other format, you need to pass the input file and create output groups to define your output format. A complete guide describing this process is available on the AWS website. This document concentrates mainly on adding DRM.
To start, select input file from some S3 bucket in your AWS account. Click on the Browse button in the Input 1 section to make it easier; alternatively, manually input a valid path.
When input file is selected, click on the Add button to add your Output groups. You may ask MediaConvert to convert your input into one of the following media formats: Apple HLS, DASH ISO (MPEG-DASH), Microsoft Smooth Streaming and File group. Select your preference to continue. Once the output group is created, you are then presented with its settings. For this example, we have selected to convert into MPEG-DASH, which allows MultiDRM to be applied.
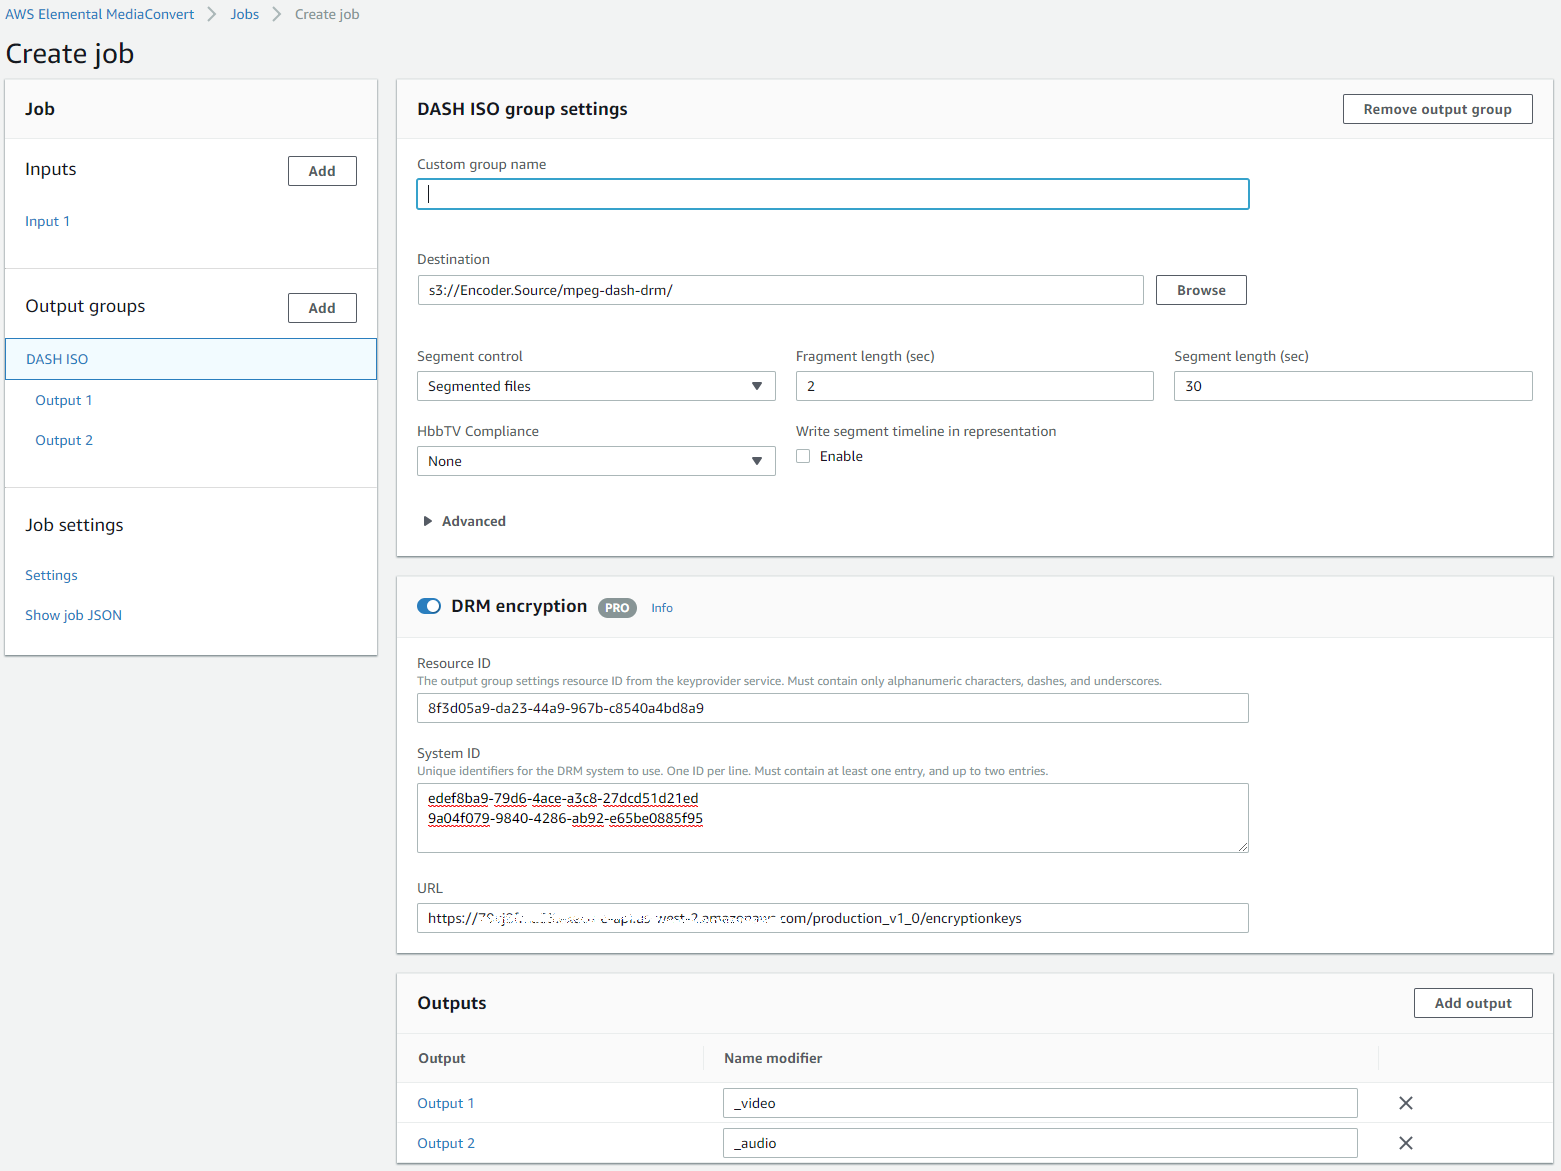
Figure 15. Output group settings.
Note: For MPEG-DASH, make sure your input is not multiplexed i.e.
- When you created the output group, click on the Output 1 and make sure you
- Give the Name modifier, something like _video or something else like _720p for example
- Remove the Audio track by clicking - Remove Audio button
- Now click on the main output group which is usually called DASH ISO in the left menu and click Add output in the Outputs table on the very bottom.
- When new output was added, click on it in the left menu. The name of the new output is usually Output 2 and
- Give the Name modifier, something like _audio, or _a or something else.
- Click on the Remove Video button
Giving Name modifiers to groups is not required, but, it gives you idea about what outputs your output group contains when you click on the DASH ISO in the left menu and look into the Outputs table. After you have done these manipulations you will see that you have your Video output separate from your Audio output
In group settings, select the output folder and enter it in the Destination field. You should also enable the DRM encryption section and enter the DRM-related values there:
- Resource ID - can be a random string. You can think of it as your file/asset name. Usually we place some random GUID in it, but you can place an actual asset name.
- System ID - this text area contains DRM system IDs, which you can get from here: http://dashif.org/identifiers/protection/. Or you can use ones below. System IDs define what DRMs are supported. For example, if you enter the System ID for Widevine and PlayReady as we did in our example above, you will allow your asset to be played back on devices that support Widevine and PlayReady. Please note that System IDs MUST be in lowercase
- Widevine: edef8ba9-79d6-4ace-a3c8-27dcd51d21ed
- PlayReady: 9a04f079-9840-4286-ab92-e65be0885f95
- Fairplay: 94ce86fb-07ff-4f43-adb8-93d2fa968ca2
- URL - this is the URL of your API Gateway that you have set up. To get the URL along with its resource, go to your API Gateway (Services -> API Gateway) and choose Stages in the left menu. Select the stage of the API you wish to use for the service.
Setting up the output group's IAM role
The final DRM-related setting is the IAM role used by MediaConvert. Click on Settings in the Job Settings section and select the IAM role from the dropdown list.
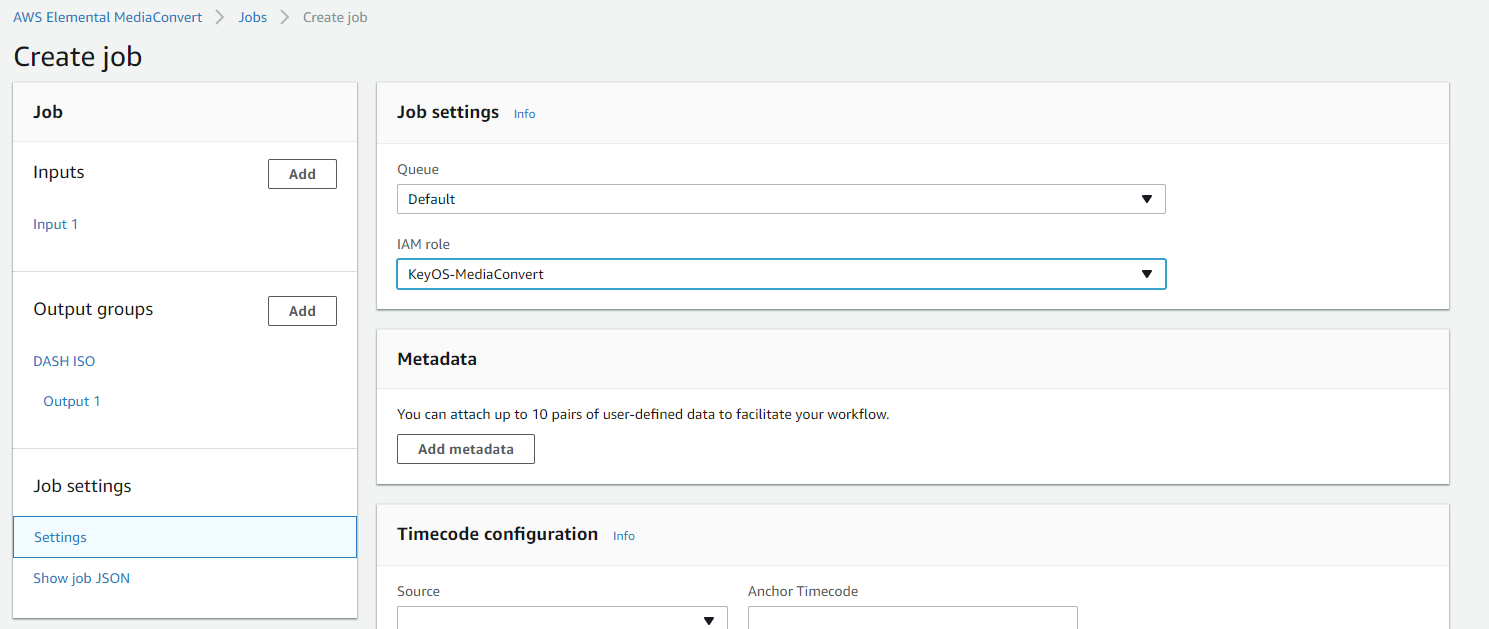
Figure 16. Selecting the IAM Role to use for MediaConvert.
You can now click the Create button on the bottom of the screen to create a Job and wait for it to complete.
Setting up DRM for HLS with FairPlay
When creating a Job for HLS + FairPlay, the steps are the same except that your DRM setup will look something like this:
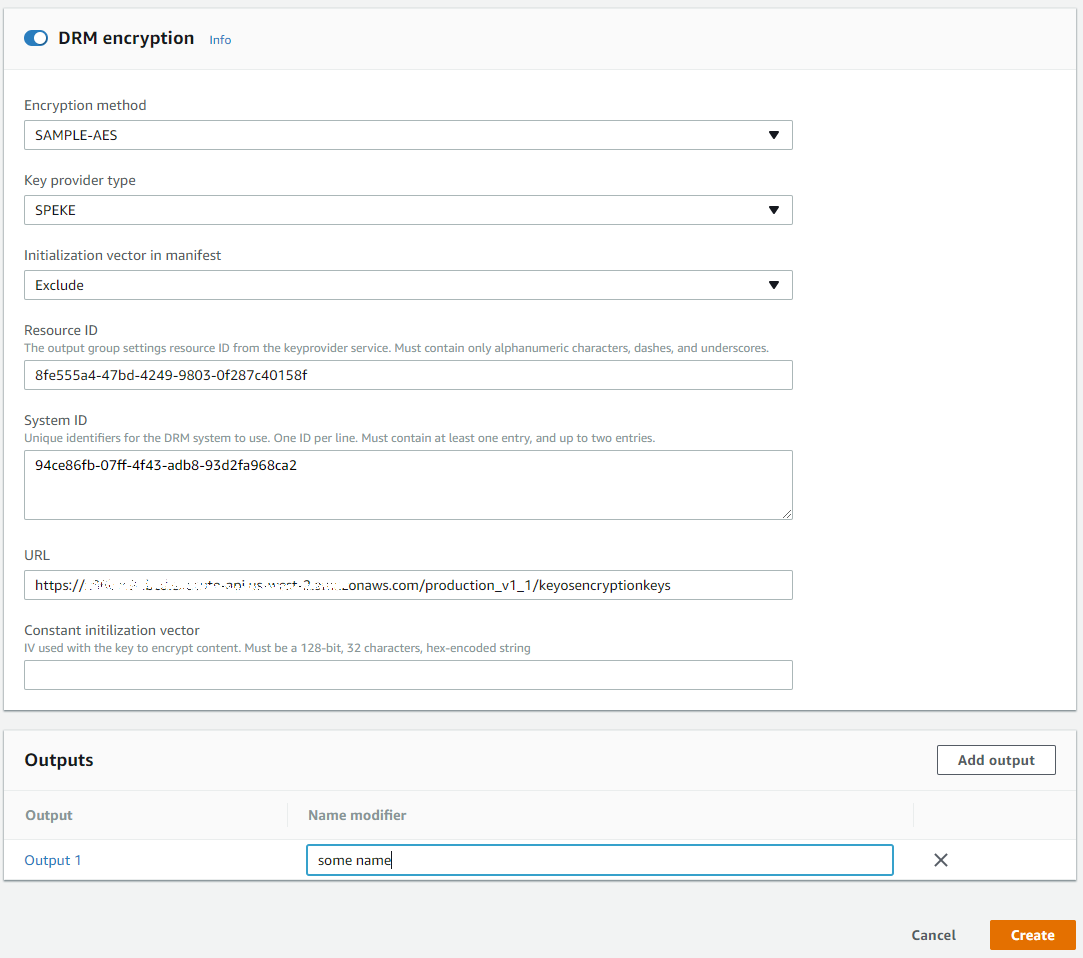
Figure 17. MediaConvert DRM setup for HLS + FairPlay.
- Encryption Method - either SAMPLE-AES (FairPlay) or AES-128. Select SAMPLE-AES.
- Key provider type - must be set to SPEKE
- Initialization vector in manifest - can be excluded, unless you require that it appear in the manifest
- Resource ID - can be a random string. You can think of it as your file/asset name. Usually we use a random GUID, but you can use the actual asset name.
- System ID - DRM system ID Taken from http://dashif.org/identifiers/protection/ or below list:
- Widevine: edef8ba9-79d6-4ace-a3c8-27dcd51d21ed
- PlayReady: 9a04f079-9840-4286-ab92-e65be0885f95
- Fairplay: 94ce86fb-07ff-4f43-adb8-93d2fa968ca2
- URL - the URL of your API Gateway along with the Resource.
You are ready to create a job that will result in a DRM protected HLS + FairPlay asset.
Setting up the MediaPackage Service
Setting up the channel
The channel is the first component in AWS Elemental MediaPackage. It represents the input to AWS Elemental MediaPackage for incoming content from an encoder such as AWS Elemental MediaLive. You can create the channel by clicking Create button when you go to Services -> MediaPackage.
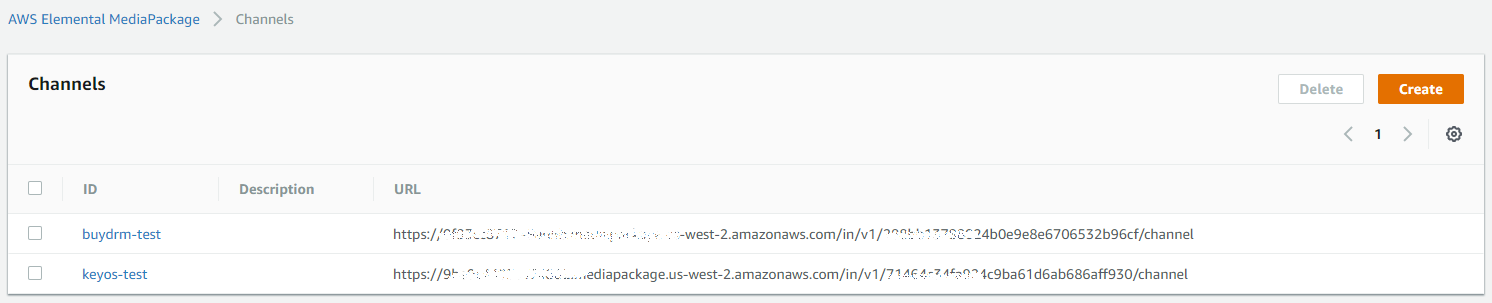
Figure 18. Creating a channel for the MediaPackage.
Setting up the endpoint
The next step is to create an endpoint within the channel. When you are inside your channel, click on Add/edit endpoints to see the screen for endpoint setup. An endpoint defines a single delivery point of a channel. The endpoint holds all the information that is needed for AWS Elemental MediaPackage to integrate with a player or content distribution network (CDN), such as Amazon CloudFront. Configure the endpoint to output content in one of the available stream formats.
Additionally, the endpoint holds information about digital rights management (DRM) and encryption integration, stream bit rate presentation order, and more.
When you create an endpoint, it provides a public URL that is fixed for the lifetime of the endpoint, regardless of any failures or upgrades that might happen over time. This URL is how the player or CDN accesses the stream from the endpoint
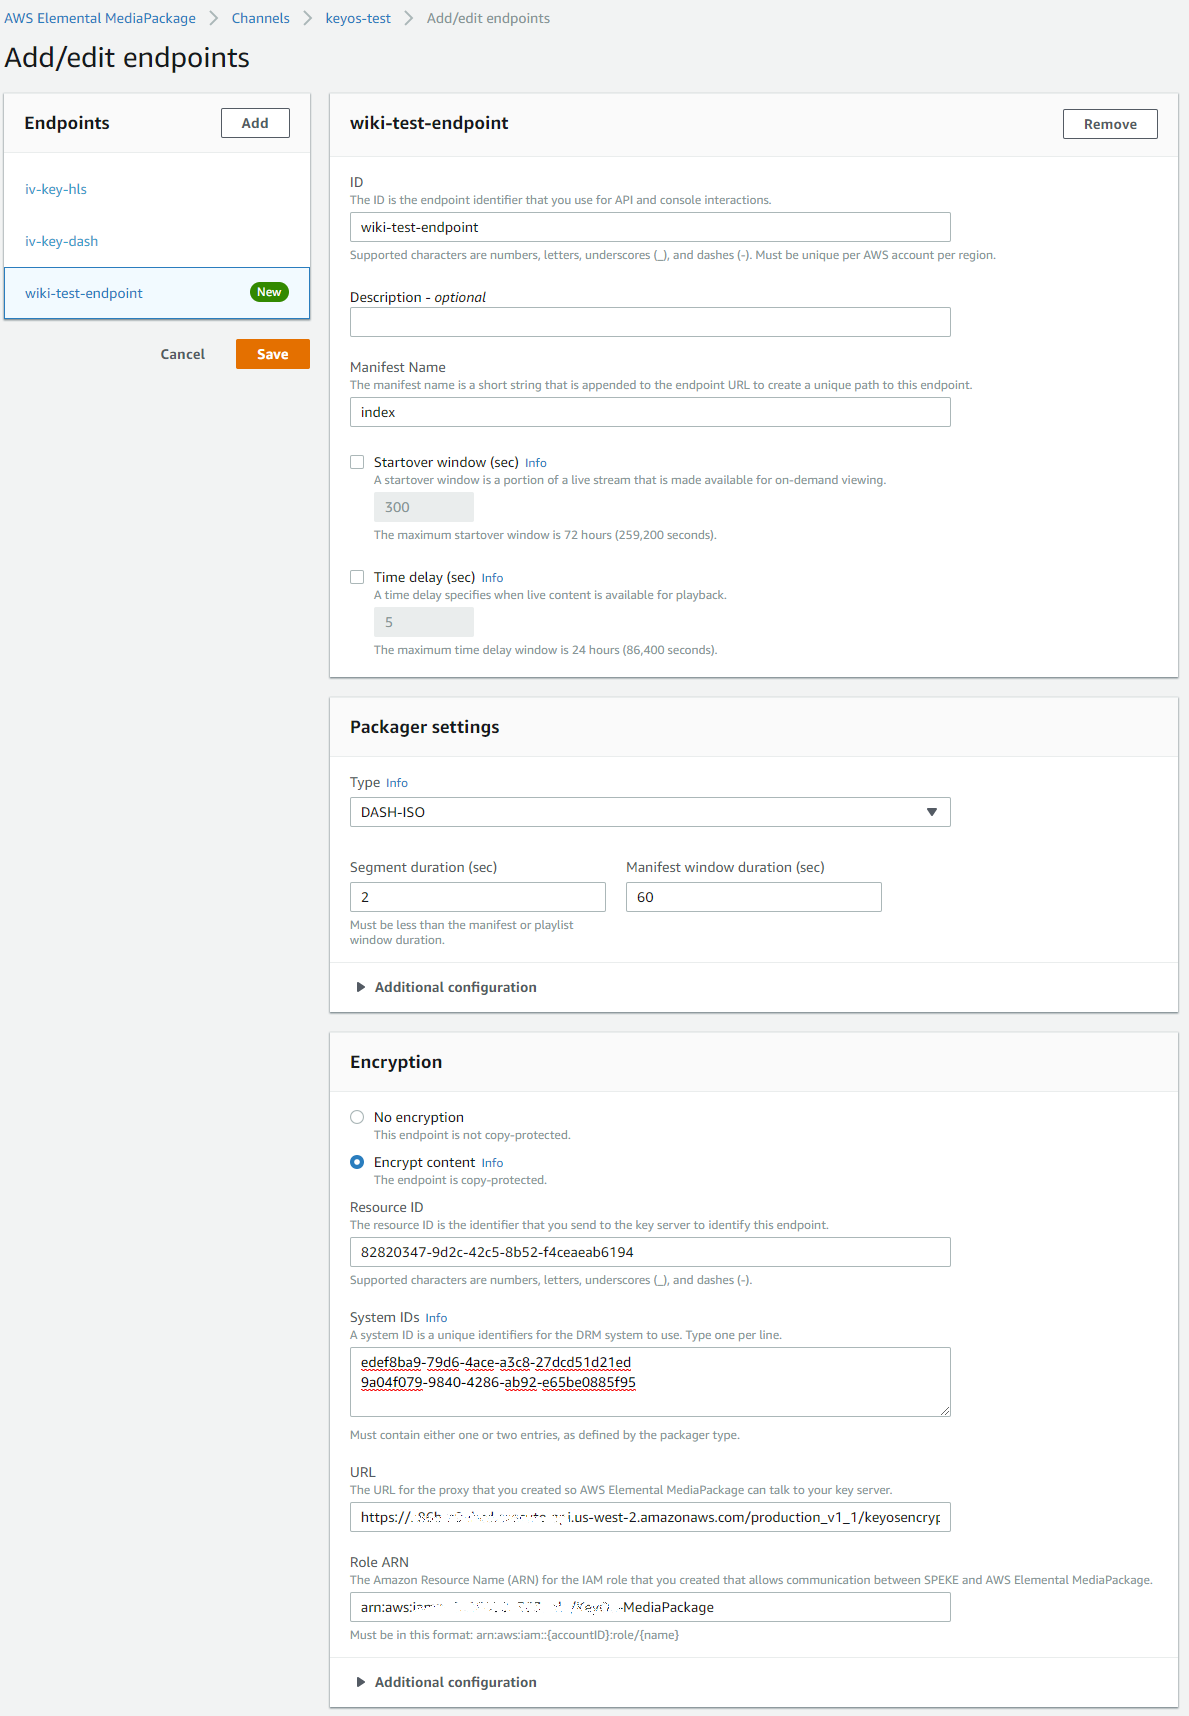
Figure 19. Creating an endpoint within the channel.
- Resource ID - can be a random string. You can think of it as your file/asset name. Usually we place some random GUID in it, but you can place an actual asset name.
- System IDs - this text area contains DRM system IDs which you can get from here: http://dashif.org/identifiers/protection/. System IDs define what DRMs are supported. For example, if you enter System ID for Widevine and PlayReady as we did in our example above, you will allow your asset to be played back on devices that support Widevine and PlayReady. Please note that System IDs MUST be in lowercase.
- URL - this is the full URL of your API Gateway that you have set up.
- Role ARN - the ARN of the role you created when you set up the role for the MediaPackage service. If you go into Services -> IAM -> Roles and select your role, you will see its ARN
When you have finished, click the Save button to save your endpoint. If your encoder was set up correctly and it is pushing data to the channel, you should be able to load your endpoint's URL into the player and see the playback (assuming the player was set up correctly to play back DRM protected assets).