When people come to us asking for DRM integration advice, they usually already have a video workflow that includes content encoding and packaging.
Customers mostly use different 3rd party vendors that are already integrated with BuyDRM like Wowza, AWS Media Services, Harmonic, Telestream and others. More recently, however, we are increasingly seeing more customers utilizing FFmpeg to produce both VOD and Live assets.
Customers using existing partners enjoy the benefit of a preexisting integration, but for those using FFmpeg, a few changes must be made to implement DRM.
Is FFmpeg Lacking?
Not at all. FFmpeg is one of the most powerful tools available when it comes to A/V content processing/encoding/packaging.
While very capable, with DRM in the picture, it leaves some things to be desired. FFmpeg does allow for AES-128 encryption with HLS, for example, with the following signaling inside your manifest:

However, this signaling is simple Clear Key which does not provide the strong encryption specification enforced with consumer DRM and mandated by studios.
Despite the fact that the DRM output is not yet available with FFmpeg, it can still be deployed within your workflow provided it is used in conjunction with other services and tools that will allow you to package the files with DRM.
Complimenting FFmpeg with Other Tools & Services
If you use the FFmpeg today in your pipeline, it mostly stays at the content preparation (encoding) side and doesn’t go beyond its comfort zone allowing other services and tools to take over the packaging and DRM application.
I have included several examples below to give you a high-level view of how you can use FFmpeg with 3rd party tools and services. Those are not going to be deep guides but should give you a better idea of how to compliment FFmpeg in order to help improve your strategy.
I won’t cover all solutions, but the idea stays the same: ffmpeg encodes/streams, 3rd party tools finish the job by packaging into your desired format (DASH/HLS/CMAF) while also applying DRM.
Using FFmpeg with Wowza Streaming Engine
If you have FFmpeg in your pipeline and want to keep it, you can easily use it with Wowza Streaming Engine to do live streaming.
Wowza has a great article that shows how it can be done here - https://www.wowza.com/docs/how-to-live-stream-using-ffmpeg-with-wowza-streaming-engine.
All you need to do is setup the listening endpoint in your Wowza Streaming Engine and use FFmpeg to stream to it, for example:

In Wowza Application (app-name) you should enable the KeyOS MultiPack Wowza Module to enable DRM on your output and you are good to go.
Using FFmpeg with AWS Media Services
FFmpeg may also be used with the AWS Media Services. For example, you can read a great article here - https://aws.amazon.com/blogs/media/connecting-ffmpeg-using-rtmp-to-aws-media-services-in-the-cloud/ about how this may be done.
All you need to do is
- Prepare your source from where you will be streaming. It may be a camera, or a local file, or some other stream you will be re-streaming
- Setup the AWS MediaLive with inputs, security groups and channels
- Setup the AWS MediaPackage with channels
- Enable the DRM integration through the SPEKE with the BuyDRM in your AWS MediaPackage channels
And you are ready to start streaming your content using FFmpeg:

The output from the AWS MediaPackage service will already be packaged according to how you have set up your endpoints with the DRM applied.
These are just a few of the many examples on how to compliment FFmpeg when using DRM for Live streaming. I have also included several examples below of how to implement DRM with FFmpeg for VOD.
Using FFmpeg with Bento4
If you do not have a requirement for Live and only need DRM for VOD, there are even more options. You can encode your content using ffmpeg and then use Bento4 to apply DRM to it and package it to a desired format (HLS/DASH/CMAF).
For example, if you have an asset, you may wan to re-encode it with different resolution:
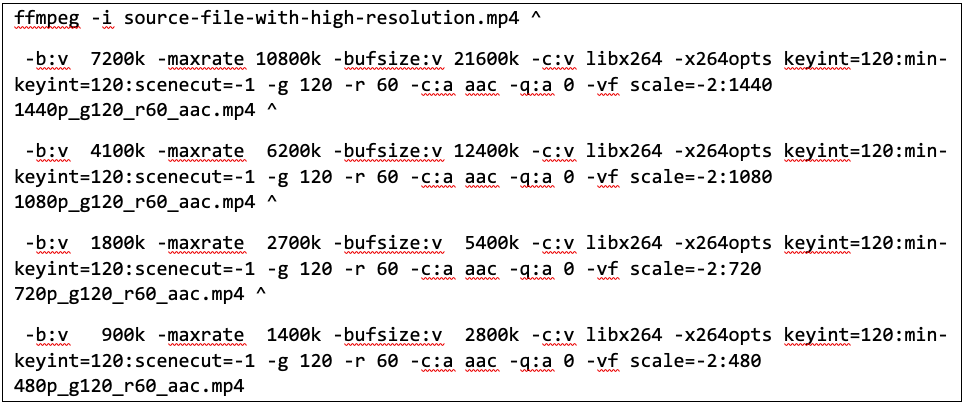
As a result, you will have the following files:
- 1440p_g120_r60_aac.mp4
- 1080p_g120_r60_aac.mp4
- 720p_g120_r60_aac.mp4
- 480p_g120_r60_aac.mp4
Next step would be downloading Bento4 and using its fragmentation tool to create fragmented versions of those files.

Later you will use fragmented versions when you will be creating your HLS/DASH/CMAF assets. You need to perform this step because Bento4 doesn’t work with non-fragmented mp4s like Shaka Packager does, for example.
Last step is to acquire keys from the KeyOS CPIX API and apply them to your output. For example, here is how you would create a DASH asset with PlayReady and Widevine applied (keys and headers are truncated):

Or an HLS with FairPlay:

Using FFmpeg with Shaka Packager
It is mostly the same when you want to use Shaka Packager along with the FFmpeg. The FFmpeg prepares your content and Shaka Packager encrypts and packages your content into the desired format. The difference from Bento4 is that you don’t need to do additional fragmentation of mp4s before using them in Shaka Packager.
For example, here is how you would create a DASH asset with PlayReady and Widevine using FFmpeg encoded content after getting the required keys and PSSH boxes from the KeyOS CPIX API:
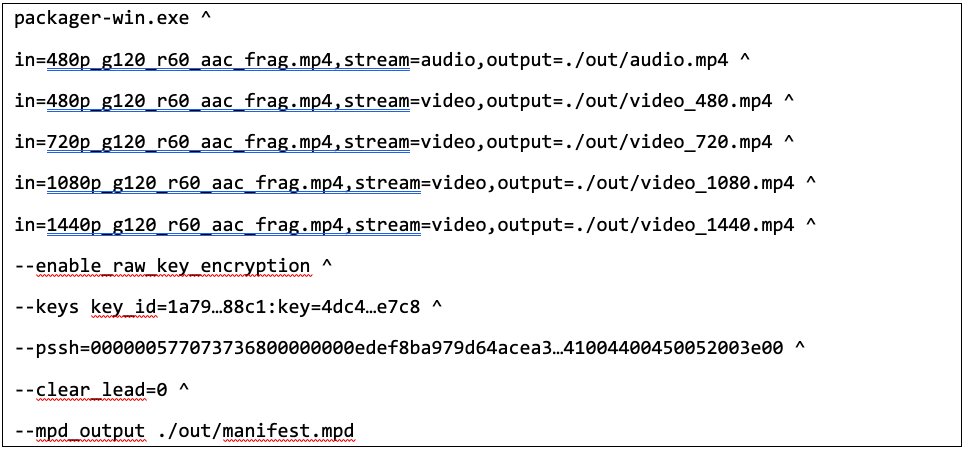
Or an HLS with FairPlay applied:
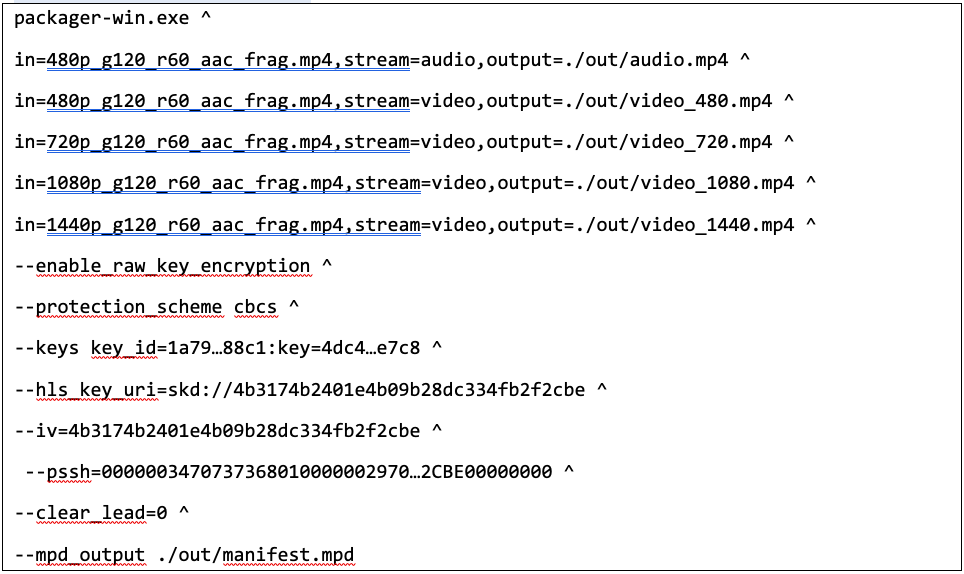
So, you see, FFmpeg is a great tool for video workflows that are streamed in the clear, but due to its limitations when adding DRM, it must be used in conjunction with other 3rd party tools and services. Someday soon that may change, perhaps maybe sooner than later.
Here is more content that you might be interested in:
-[BLOG PART 1] Creating DRM Workflows - Part 1 - Content Encryption
- [BLOG PART 2] Creating DRM Workflows - Part 2 - 3rd Party Encoding Solutions
- [BLOG PART 3] Creating DRM Workflows - Part 3 -"3rd Party Server Solutions"


